


Make revisions to your code without disrupting production
Previously we covered the introduction to Git by installing a git server and some basic commands such as git reset, revert, cherry-pick, etc. All changes took place on a single branch, known as the master (default) branch. But suppose you want to introduce some new functionality or fix a bug without disrupting the live code while ensuring the code you have is the latest version. A method known as branching allows you to make changes in parallel without affecting the original state.
What is a Git branch?
The default branch name in Git is master. Keeping track of the current branch is done by using a special pointer called HEAD. Git stores the data in a series of snapshots, each referencing a commit, tree and blob(s). Check out the previous blog, How to Build a Git Server, which shows how a repository stores the data.
Setup the git repository to lab
Firstly, let's create a new bare repository for testing out the Git branching features on the git server. We'll use the ansible-playbook we previously in the blog Installing Ansible and Automating a Git Server to create the shared repository on the server.
cd playbooks
ansible-playbook create_project_playbook.yml -i inventory.yml
Enter the directory name to be created:
branching_gitNow initiate the local repository on the client machine and create a readme.txt file for the first commit. Then push the change to the remote repository.
cd ..
git init branching_git
cd branching_git
touch readme.txt
git remote add origin git@10.12.120.5:branching_git
git add readme.txt
git commit -m "Initial commit"
git push origin master
Now we are setup to start.
Viewing the current branch
If your current setup does not show the current branch you’re currently working on within the terminal view. You can use some git commands to find out the information. There are multiple options based on the information required.
Local branches
git branch -lThe command lists all branches and highlights the currently checked out branch with an asterisk. It does not list the remote branches on the shared repository.
Remote Branches
Remote branches reference the state of the remote repositories HEAD to ensure shared the repository is in sync with all users. Listing just the remote repositories requires the -r option with the git branch command.
git branch -rAll Branches
Listing both local and remote branches is done with the -a option.
git branch -a
Creating branches
There are several ways to create a new branch, but it really depends on what you want the outcome to be when deciding on the command to use.
For instance, if you want to create a new branch but not check it out, you can use git branch.
git branch developOr you could use git checkout with option -b.
git checkout -b developmentThe former command only creates the branch, whereas the latter creates and checks it out. Next, confirm the new branches were created by listing them.
git branch -l
The command git branch main functions are to list, create, and delete branches.
What is git checkout?
Well, git checkout works hand in hand with git branch by providing the means to switch to another branch whether new or pre-existing.
Imagine you want to create a branch and switch to it straight away. You could do this:
git branch new_branch
git checkout new_branch
But a more convenient way to achieve the same result is to use git checkout to create and switch in one go.
git checkout -b new_devIt creates a new branch named new_dev and switches to it.
Let’s list all the branches.
git branch -l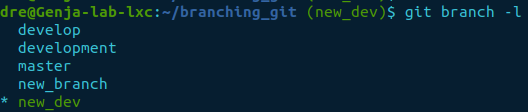
Create a file to show the difference between branches
Let’s list the files in the current directory of the master and develop branches.
git checkout master
ls
git checkout develop
ls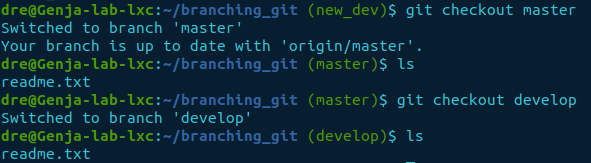
As we can see, there is only a readme.txt file in both the master and develop branches.
We’ll create a new file called branching.txt and commit it to the develop branch.
echo “This is a test for branching” > branching.txt
git status
git add branching.txt
git commit -m “Adding the branching.txt file to the develop branch”
Now the branching.txt file has been committed to the develop branch. Let’s list the files in the directory, then switch to the master branch to see if the file exists there too.
ls
git checkout master
ls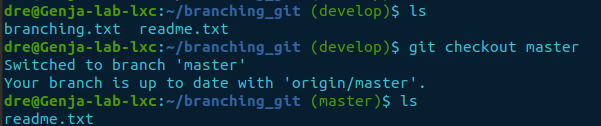
The result shows the develop branch has the branching.txt file while the master branch remains unchanged.
How do I delete a branch?
Deleting a branch is quite simple. The only caveat is you should not currently have it checked out. Otherwise, it will error.
git branch -d new_branchIf you have more than one branch to delete, just enter them in series. But beware, you can’t have the branch you wish to delete checked out. So we’ll switch back to the master.
git checkout masterNow let’s delete two branches new_dev and development.
git branch -d new_dev development
Confirming the branches have been deleted.
git branch -l
Tracking connections
Git allows you to track remote connections by monitoring if the remote repository has changed since your last pull or whether your local repository is ahead because you’ve made changes.
Tracking is also known as --set-upstream, has some added benefits such as:
- If tracking is enabled on a branch, pushing and pulling changes becomes easy as you do not have to specify the destination and branch, i.e.,
origin/master - It lists the number of changes the repository is ahead or behind
It is not entirely automated and requires some triggers to pull the remote object reference name and branch name.
Setting tracking
When a remote repository gets cloned, by default all the remote branches are tracked and set as the upstream branches.
While pushing changes to the remote repository, you can enable tracking using option -u or --set-upstream.
git push -u origin master
It will only set tracking on the specified branch if you want to track all branches option --all.
git push --all -u originThe response should show the creation of the new develop branch on the remote repository and list all the branches it sets the tracking on at the bottom.
Setting up an existing branch for tracking
If you just pulled some changes and want to set up tracking, you can set up tracking using the git branch command without pushing any changes.
First, we’ll create three new branches to demonstrate the next task.
git branch branch_1
git branch branch_2
git branch branch_3
git branch -l
Next, push all the branches to the remote repository as the ones we just created do not exist at the far end.
git push --all originImagine we decided we want to track the branch but don’t need to push anything. We could do a push, but we can also use another command to enable tracking without the need. Let’s switch to branch_1 and set the tracking up.
git checkout branch_1
git branch -u origin/branch_1
The above command doesn’t include the branch name. It just specifies the remote origin/branch_1. So it defaults to the current branch, which is branch_1.
If you want to set up a specific branch for tracking, you can do so with the following command without checking it out.
git branch -u origin/branch_2 branch_2The command sets tracking for the local branch, branch_2, to the remote, origin/branch_2 repository.
Is tracking enabled?
Checking if tracking is enabled can be done with the branch -vv option, listing all the branches.
git branch -vvNotice the remote name/branch combination in square brackets i.e., [origin/master]. It denotes the branch is being tracked and the remote destination. It also shows if the branch is in or out of sync.
Let’s modify the current branch to see how tracking displays if it is in sync.
echo “Testing tracking @ $(date)” > tracking.txt
git add tracking.txt
git commit -m “Adding tracking.txt to check sync”
Now if we list the branches again, we should expect to see something new.
git branch -vv
Highlighted above shows that branch_1 is ahead. Meaning the local repository is ahead of the remote repository by one commit.
You can also check the state by using git status for the current branch you’re working on.
git statusThe status gives a clear indication of it being ahead by one commit.
However, bear in mind that this information may not be up-to-date. So it may not reflect the current situation of the remote branch.
Updating the current tracking status
If changes have been made on the remote repository by another developer pushing changes to it. Then the local information will be out of sync with the remote. Tracking doesn’t periodically check the upstream repository for changes.
Let’s create another directory outside of the current local repository and clone the repository branching_git into it.
cd ..
mkdir branching_clone
cd branching_clone
git clone git@10.12.120.5:branching_git
cd branching_git
We should now be inside the cloned repository. We can confirm this by listing all the branches.
git branch -a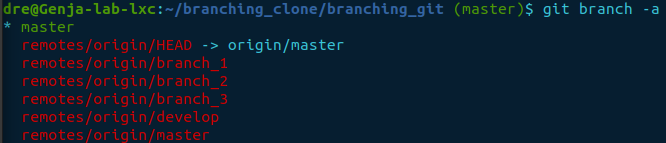
Switch to branch_1 then list the contents and check if it’s in sync.
git checkout branch_1
ls
git branch -vv
The output shows branch_1 is in sync and only has the readme.txt file in the directory. Whereas if you recall, the original git directory is ahead by one. Let’s push the change from the original directory to the remote repository, then check if it’s in sync.
cd ~/branching_git
git push
git status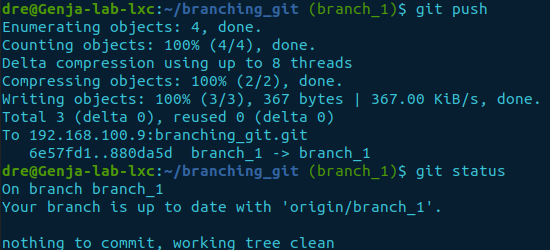
Now we can see the branch is in sync. If we go back into the cloned directory, will it be the same?
cd ~/branching_clone/branching_git
git branch -vv
ls
There has been no change.
How can we fetch the information?
You can obtain this information using the command git fetch to pull the change records represented by refs. It will be compared with the local repository to highlight the current state. The information gets stored in the .git/FETCH_HEAD file containing the object sha1 hash reference and the branch name.
git fetch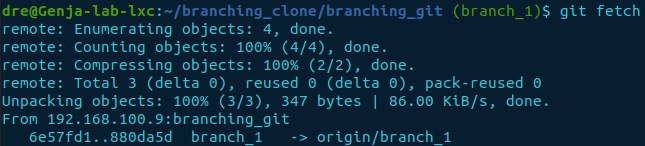
If no remote is specified, and there is an upstream branch configured for the current branch, the upstream will be used. Otherwise, it defaults to the name origin, i.e., git fetch origin as in git fetch <remote>. Meaning all remote branches under the name origin will be interrogated if no remote name is specified.
But it looks like it downloaded something. Let’s have a look and see.
git branch -vv
So how do we catch up?
We have to use the git pull command. It combines git fetch and git merge. The latter actually downloads the file(s).
git pull
We can confirm it has truly been updated by listing the directory and checking the branch state.
ls
git branch -vv
Success, we now have the tracking.txt file in the directory of branch_1 and, it’s all in sync.
Wait, how do I merge/copy the branches?
Here is where the final git command to complete the life cycle of a git branch gets introduced. It is the command git merge that merges two or more branches together.
Let’s go back to the original repository and make an update on branch_1 by creating a new text file.
cd ~/branching_git
echo “Merging branches!” > merge.txt
git add merge.txt
git commit -m “Created merge.txt.”
Next, check out the branch you want to import the changes to and list its contents. There isn’t an option to specify a source and destination. The destination is the current branch you have checked.
git checkout branch_2
ls
Next, merge branch_1 into branch_2.
git merge branch_1
ls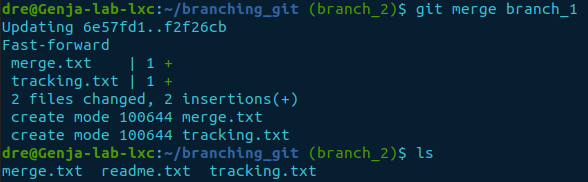
The command commits the changes for you. If you don’t want it to commit when entered, use the options --no-commit and --no-ff. As --no-commit alone does not stop fast-forward updates from committing.
Conclusion
Now we know how to make changes to our code using git branching. We have a number of tools to integrate Git into, but this set's us up for integration with Jenkins.