


Make your own Junos RPC discovery tool
During the installation of Junos PyEZ, there is a list of dependencies installed with the junos-eznc package. One of those is called lxml. To find out the current list of packages that get installed during installation, head to the junos-pyez repository on GitHub and view the requirements.txt file. The information will be relevant to the current version of Junos PyEZ.
What is lxml?
A python module for parsing and building XML and HTML documents, mostly compatible but superior to the well-known ElementTree API. The xml.etree.ElementTree module is part of the Python standard library when you install Python.
How does lxml can into play?
In the previous blog, “Juniper Operational Automation”, we covered RPC discovery using the pipe | display xml rpc command; from the device’s CLI. We used it to find out the equivalent RPC call for the PyEZ scripts, used with the rpc method from the jnpr.junos Device class. It can be inconvenient having to log into a device via the CLI each time to retrieve the RPC for a particular show command. The Device class has a method just for this purpose, and it takes show commands. Being able to script it will save time, achieved by using the following commands:
from jnpr.junos import Device
with Device(host=”10.0.20.12”, user=”juniper”, password=”password”) as dev:
   dev.display_xml_rpc(“show version”)
The command dev.display_xml_rpc(“show version”) is what we are after. It will return the RPC, but as an lxml.etree.Element object.

How do we view the lxml.etree.Element object?
There are multiple ways to view the object. The first is by appending the tag attribute to the command:
dev.display_xml_rpc(“show version”).tagThe response is exactly like the CLI’s counterpart, get-software-information. However, it contains hyphen’s (-), not what we need for creating an RPC. As the response is a Python string, we can use the replace method, substituting the hyphen’s (-) for underscore’s (_). Take a look at the code below:
dev.display_xml_rpc(“show version”).tag.replace(“-“, “_”)
response = get_software_information
Simplifying RPC discovery
If you wanted to quickly get the correct syntax without having to amend your scripts, you could create a program to get that information for you.
Before moving on and creating that said tool, we will update the login mechanism to the Junos device and script to use SSH keys with password protection first.

Upgrade login to use ssh keys
Let's make a copy of the connect.py file and name it connect_ssh_key.py within the same directory. If you haven't been following along from the previous blog, it can be found in my GitHub repository here.
Next is to navigate into the ~/.ssh folder and generate the SSH keys using the ssh-keygen.
cd ~/.ssh
ssh-keygen -t rsa -b 2048
The file name can be left blank and will default to id_rsa. When prompted, enter a passphrase. Otherwise, there will be no password protection.

Once completed it will output two files named id_rsa and id_rsa.pub.
Next, we need to add the public key to the Juniper device. You can either copy and paste it into the device or download it. We'll go with the latter, as we are all about automation. Copy and paste can introduce errors. Log into your Junos device and enter the following command, substituting juniper and user with the relevant usernames and the correct IP address of your Linux PC.
set system login user juniper authentication load-key-file
user@10.0.20.5:/home/user/.ssh/id_rsa.pub
You will see it download the file. Check the change by doing a show | compare, you will see the contents of the id_rsa.pub file. Save the changes with commit.
The device is now ready to authenticate using the ssh keys. Let's give it a try.
ssh user@10.0.2.12If successful you'll be logged into the device without prompting for a password.
Now let's update the connect_ssh_key.py file to use the ssh-keys. We need to delete the username variable and argument from the Device(username=username), not forgetting to update the except output. The same can be said for the password, except we will be updating the password descriptions to key_password. The key_password variable used's to open the password-protected ssh-key file. It adds a layer of security. We no longer need to specify a username. One less step!
Remove
username = input('Enter username: ')
    with Device(user=username)
Add/update
key_password = getpass('Enter key password: ')
try:
    with Device(password=key_password) as dev:
except jnpr.junos.exception.ConnectAuthError as autherr:
    print('Check key password', autherr)
Final file
The new connect_ssh_key.py file should now appear as the code below. It can also be found on GitHub connect_ssh_key.py
from jnpr.junos import Device
from getpass import getpass
import jnpr.junos.exception

ipadd = input('Enter hostname or IP address: ')
key_password = getpass('Enter password: ')

try:
    with Device(host=ipadd, password=key_password) as dev:
        print('Are we connected?', dev.connected)
except jnpr.junos.exception.ConnectAuthError as autherr:
    print('Check key password', autherr)
Test the new script to ensure the keys work as excepted. python3 connect_ssh_key.py

Creating an RPC discovery tool
Now that we have the new connect_ssh_key.py, we will use this as our base template. Make a new directory in the PyEZ folder called tools. Create a copy of the connect_ssh_key.py file putting it into the tools folder, name it rpc_discovery_tool.py.
mkdir tools
cp connect_ssh_key.py tools/rpc_discovery_tool.py
Open the newly created file to add the code. We will include the code we covered earlier, which discovers RPC's modifying the result into the correct syntax. dev.display_xml_rpc(“show version”).tag.replace(“-“, “_”).
import sys- the sys module provides functions and variables used to manipulate different parts of the Python runtime environmentsys.argv- allows you to enter arguments at the command line for utilisation in your Python program. Stored as a Python list, index 0 is always the name of the module, index 1 upwards, will be arguments from the command line
Python lists are indexed, with 0 being first in the list. If you wanted to access just one item in a list, i.e., example_list = [1, 2, 3, 4]. To retrieve the second item, number two. You would use the following command, example_list[1]. Remember indexing starts at 0.
Add the additional code to the rpc_discovery_tool.py file, group import sys with the other imports. The additional try-except clause will be inserted under print('Are we connected?', dev.connected)
import sys

        try:
            print("*" * 70, "\n")
            if sys.argv[1]:
                for arg in sys.argv[1:]:
                    sys_cmd = dev.display_xml_rpc(
                                  arg).tag.replace("-", "_")
                    print(arg, f"= {sys_cmd}", "\n" + "-" * 70)
                print("\n\n" + "*" * 70)
        except IndexError:
            print(
"""
No command entered, i.e.,

python3.py rpc.discovery_tool.py 'show version'
""")
The final rpc_discovery_tool.py file
from jnpr.junos import Device
from getpass import getpass
import jnpr.junos.exception
import sys


ipadd = input('Enter hostname or IP address: ')
key_password = getpass('Enter key password: ')

try:
    with Device(host=ipadd, password=key_password) as dev:
        print('Are we connected?', dev.connected)
        try:
            print("*" * 70, "\n")
            if sys.argv[1]:
                for arg in sys.argv[1:]:
                    sys_cmd = dev.display_xml_rpc(
                                  arg).tag.replace("-", "_")
                    print(arg, f"= {sys_cmd}", "\n" + "-" * 70)
                print("\n\n" + "*" * 70)
        except IndexError:
            print(
"""
No command entered, i.e.,

python3.py rpc.discovery_tool.py 'show version'
""")
except jnpr.junos.exception.ConnectAuthError as autherr:
    print('Check key password', autherr)
We can test the tool by providing the variables at the command line when initiating the program. It can be a single command or multiple, with each one enclosed in ( " ) or ( ' ) shown below:
python3 tools/rpc_tool.py "show version" "show system users" "show interfaces"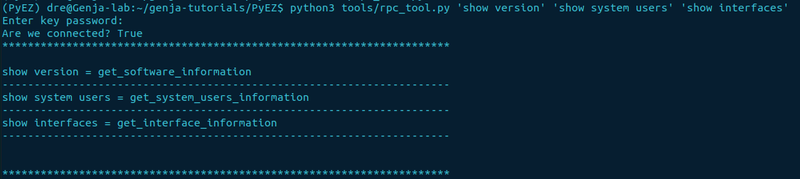
Next up
We've finished creating an RPC discovery tool. It will be handy for the next blog covering the Python lxml module in more depth.