


Automated keyword-driven testing
Robot-framework is a keyword-driven generic test automation framework for acceptance testing, ATDD (Acceptance Test-Driven Development) and BDD (Behaviour Driven Development). It allows test libraries to be written in various programming languages such as Python, C++, Java, etc.
What is ATDD?
Acceptance Test-Driven Development (ATDD) is a software development methodology, not a testing technique. It’s often associated with the agile methodology and closely related to Test-Driven Development (TDD).
In a nutshell, TDD is a development process that relies on unit tests written before the actual code has. It results in the test(s) failing. The developer has to create the code to make it pass.
Unit testing vs Acceptance testing
Unit testing tests whether individual methods and functions are working correctly and if there are no errors.
Whereas acceptance testing is from the view of the end-user, ensuring the business requirements have been met and working as expected. Acceptance testing is only functional testing.
In acceptance testing, there are two methods:
- Alpha testing – testing is completed in-house and tested internally by employees or sometimes real users.
- Beta testing – is the final stage of acceptance testing, completed by end-users after the internal tests have been satisfied.
Installing robot-framework
The suggested method is to install Robot Framework using pip, as the framework is written in Python.
Robot Framework has built-in libraries such as Builtin, OperatingSystem, DateTime, etc. There are also external libraries such as SeleniumLibrary, DatabaseLibrary, etc.
If you are using a virtual environment, start that as demonstrated below. Then install Robot Framework or continue as normal by just using pip to install.
python3 -m venv robot_tests
cd robot_tests
pip3 install robotframework
Next, verify the installation of Robot Framework.
robot --versionSetting up a test case
A test case can be set up in a single file or have separate directories.
There are different sections in a robot test case file. Sections are also known as tables.
- Settings – used to import libraries, resource files and variables files. Including metadata, test suite setup and teardown data
- Variables – sets variables to be used elsewhere in the file, typically for arguments.
- Test Cases – creates a test from keywords and variables.
- Tasks - same as test cases
- Keywords – creates keywords from one or more lower-level keywords creating a comprehensive function if required.
- Comments – create data or comments ignored by the Robot Framework
A single file can either contain a Test Cases or Task section. The syntax between the two is identical.
Filename extensions
Robot test files should have the file extension .robot. Resource files can use .robot or the recommended extension .resource.
Space-separated vs pipe separated format
Space-separated formatting
Space-separated formatting requires two spaces or more or one plus tab characters. Spacing doesn’t have to be consistent as long it is more than two. However, it is highly recommended to use four spaces for ease of readability.
*** Settings ***
Library	   OperatingSystem

*** Variables ***
${HOST}	   genja.co.uk
Con
Using this format has a drawback if you want to use tabs and consecutive spaces in the string. They need escaping with special syntax such as an \t for tab. i.e.
This is\ttabbedPipe separated formatting
The piped format makes the separations appear more appealing to the eye and reduces the need for escape sequences for whitespace.
A space after the pipe character has some importance. Otherwise, there will be a [ERROR] message when trying to run the test.
| *** Settings ***    |
| Library             | OperatingSystem

| *** Variables ***   |
| ${HOST}             | genja.co.uk
This format is easier to distinguish the separated keywords and functions.
However, pipe | in this instance is to act as a separator. If used within a command, it needs escaping with a backslash \.
Variables
Variables allow you to store data such as scalars, lists, dictionaries, etc., that can be used elsewhere and makes it easy to make changes centrally if the variable is used more than once. They are case-insensitive, but a recommendation is to create global variables with capital letters ${HOST} and local variables with lowercase letters ${local}.
Global
For instance, variables created in the variable section are considered global and should use caps.
| ${HOST} | global variableLocal
A variable created from a return value is considered to be local and can’t be seen in other tests or keywords.
| ${local} = | Get Variable | testThe ${local} variable returns a value after running the keyword Get Variable with the argument test.
Keywords
Keywords are action statements based on a low-level function at the lowest level if used directly from an imported library. However, there is an option to create your custom keywords, known as user keywords.
User Keywords
User keywords live under the *** Keywords *** section providing you with the means to create additional higher-level keywords. Meaning you can create a new keyword for a group of keywords.
Creating a simple test case
We’ll create a simple test case to check for a file on a remote device. It will require the use of the external library SSHLibrary.
Installing external libraries
If you require an external library listed here https://robotframework.org/?tab=libraries#resources, then follow the installation instruction provided within the library link. For instance, if you want to install the SSHLibrary module, one way of installing it is using Python pip3:
pip3 install robotframework-sshlibrary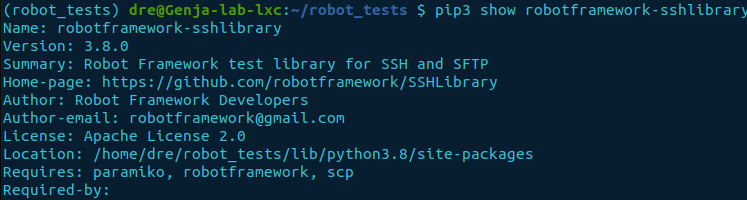
SSH Library
Use the library to initiate an SSH connection and execute remote functions and commands.
Create a test case file
Now we'll create and open a test case file named remote_file_test.robot within the virtual environment directory we started previously.
vim remote_file_test.robotSetup the suite
Firstly import the SSHLibrary and add some documentation explaining the purpose of the test suite.
| *** Settings *** |
| Documentation    | Example for checking if a file on a remote device
| Library | SSHLibraryVariables section
Next up we’ll create some variables used to connect to the remote device and when locating a file.
| *** Variables ***  |
| ${HOST}            | 10.120.12.5
| ${USERNAME}        | user
| ${PATH} | /home/${USERNAME}/robot/robot.txtKeywords section
We’ll create a function to connect and log into the remote device, as the actions require two keywords/functions.
| *** Keywords ***            |                 |             |
| Open Connection And Login   |                 |             |
|                             | Open Connection | ${HOST}     |
|                             | Login           | ${USERNAME} | allow_agent=True
Now opening a connection and logging in can be completed with the new keyword Open Connection And Login. Notice the Login keyword argument allow_agent=True. It’s optional but enables the use of the ssh-agent when using ssh-keys.
Next, we’ll create the last section to tie it all together.
| *** Test Cases *** |
|                    |
| Connect to device  |                             |
|                    | [documentation]             | SSH to remote device
|                    | Open Connection And Login  |
| Check for file     |                             |
|                    | File Should Exist           | ${PATH}
Complete test file
The complete test case file should resemble the output below.
| *** Settings *** |
| Documentation    | Example for checking for a file on a remote device
| Library          | SSHLibrary

| *** Variables ***  |
| ${HOST}            | 10.120.12.5
| ${USERNAME}        | user
| ${PATH}            | /home/${USERNAME}/robot/robot.txt

| *** Keywords ***            |                 |             |
| Open Connection And Login   |                 |             |
|                             | Open Connection | ${HOST}     |
|                             | Login           | ${USERNAME} | allow_agent=True

| *** Test Cases *** |
|                    |
| Connect to device  |                             |
|                    | [documentation]             | SSH to remote device
|                    | Open Connection And Login   |
| Check for file     |                             |
|                    | File Should Exist           | ${PATH}
Remote device
Log into the remote device of choice and create empty directory called robot within within the home folder.
mkdir robotRunning the test
Initiating the test case requires the robot function at the command line followed by the name of the test.
robot remote_file_test.robotOnce you hit enter, it will run the command and output basic information to the command line. It will also create three files relative to the test case file.
Should you get an error message as per the Load SSH Agent section below, follow the instructions to load the key and try again.
The files are:
- output.xml – contains the outputted information in an XML format
- report.html – it is a very high-level report (open in a web browser)
- log.html – provides a detailed output (open in a web browser)
Load SSH agent
If the test fails and it presents an SSHException message as below.
The potential issue could be the key has not been added to the ssh-agent. Use the following command to add the key and try again.
eval “$(ssh-agent -s)”
ssh-add ~/.ssh/id_key
Substitute the path after ssh-add with the correct location and name of the key.
Failed test result
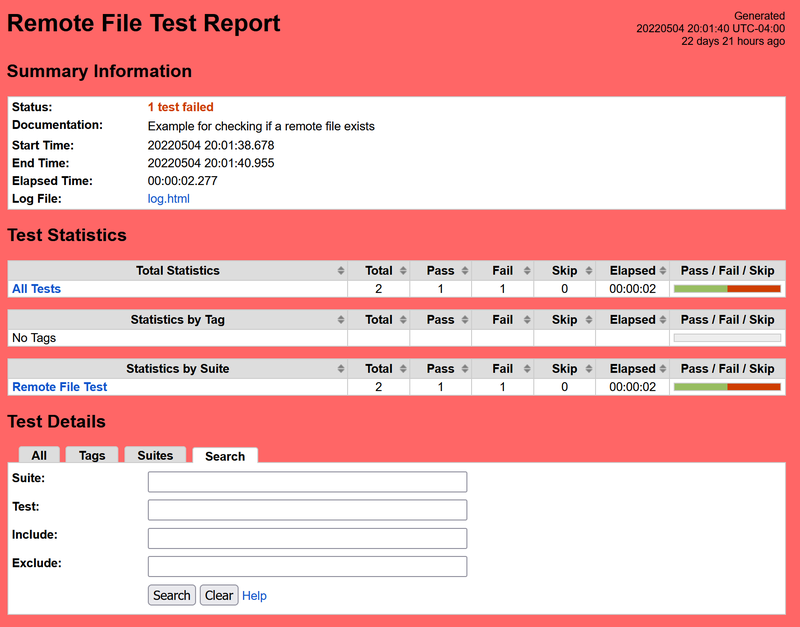
Above is the output of the failed test result. We are getting this outcome because the robot.txt is non-existent yet.
Let's create the file and re-run the test.
Remote device
touch robot/robot.txtNow we have created the robot.txt file on the remote device we can re-test with the expectation of passing the test.
Local device
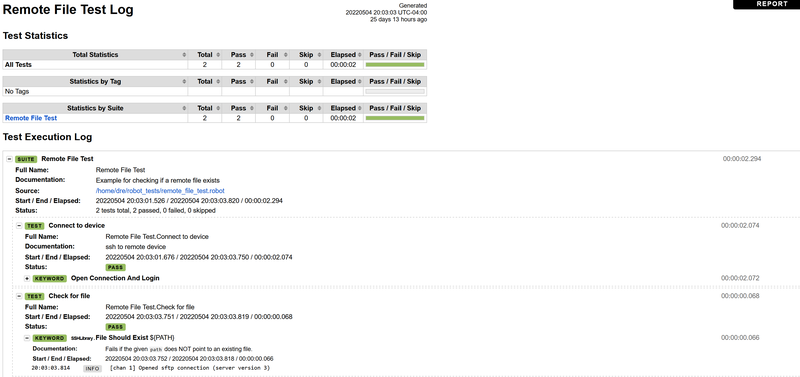
robot remote_file_test.robotPassed test result
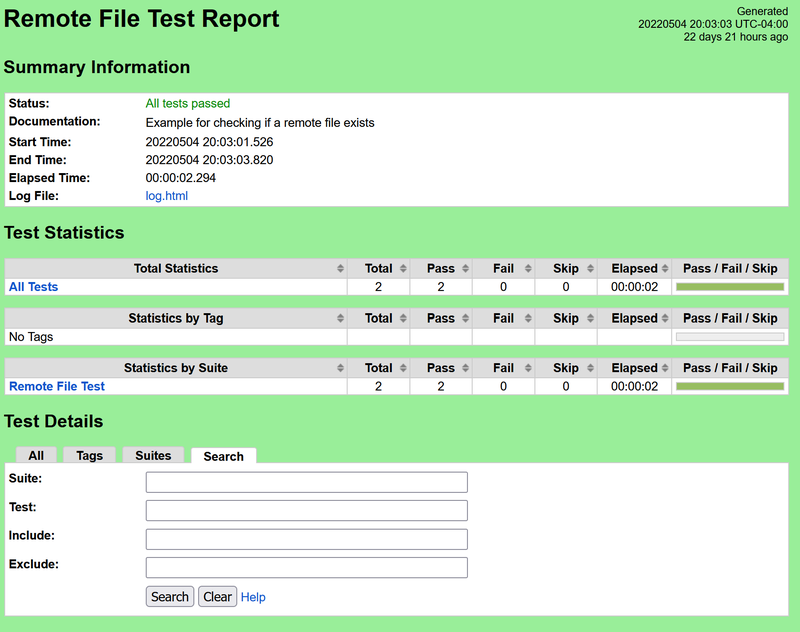
As the output shows, the test passes with flying colours. Clicking on the log.html link gives a more detailed output.
Conclusion
We now have our first basic test that has passed.
In the next post, we'll create our own custom libraries.