


Write your first playbook to create a Git server repository
What is Ansible?
Ansible is an open-source automation platform used to automate IT infrastructure, automating mundane tasks like creating directories and folders to rolling out updates across the estate to your servers and network devices.
But what makes it even more appealing is it is agentless, meaning it requires no software installed on the remote device, which makes it fantastic for automating network hardware.
With the boom in network automation over the years, there has been an increase in modules available in Ansible, aiding network automation functionality.
Installing Ansible
The control node is the machine (which Ansible runs on), should have Python 3.8 or newer installed (at time of writing). Installing Ansible can be done by using the package manager for Unix-like OSes, such as apt, or via the Python Package manager, pip.
The managed nodes (devices you connect to) has no requirements. Other than the fact of remote connectivity.
A recommendation is to install Ansible using the package manager of the OS, as pip doesn’t coordinate with the system manager and could leave you with some inconsistencies.
apt (Debian/Ubuntu)
sudo apt install ansibleOr using the Python package manager, PIP.
pip3 (Python3)
sudo pip3 install ansibleDirectory layout
There are a couple of ways to organise your playbook directory. The first is known as Ansible roles, based on a directory structure, and the other groups the bulk of the content within a playbook.
The advised approach is to use Ansible Roles. It is developed in a way to make sharing and reusing roles easy.
Roles
The way Ansible roles functions is to load particular variables held with the sub-directories of the named role.
Role directory structure
An Ansible role has a defined directory structure with eight defined sub-directories. You must include at least one of these directories within each named role sub-directory. If the others are not needed, there is no need to create them. For example:
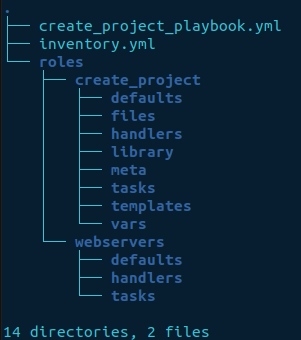
Note each sub-directory in the roles folder needs to have a main.yml file. Otherwise, it will not work. You can then create additional files as required.
Create an inventory file
INI (Ansible’s default)
The default location of the inventory file is /etc/ansible/hosts. You can amend the file and add your devices or create a new file and make Ansible aware of the inventory when running the playbook.
The examples in the /etc/ansible/hosts file format in the INI stanza.
i.e.,
INI file
[webservers]
10.0.10.11
15.16.15.178
web01.example.com
It might take a little extra effort to get the formatting right to create the file. But, it’s advisable to use the YAML format for your inventory, as the inventory plugin processes the variable values consistently.
Values in the INI format using the key=value stanza can be processed differently depending on where used. If you decide on writing Python scripts to dynamically create the inventory, YAML will begin to show its strengths.
Let’s create a YAML inventory file
Create a new directory in your home folder called playbooks and navigate into it.
mkdir playbooks
cd playbooks
vim inventory.yml
YAML file
---

all:
  children:
    servers:
      hosts:
        automation_server:
          ansible_host: 10.12.120.18
        10.12.120.120:
    lab:
      hosts:
        git_server:
          ansible_host: 10.12.120.5
          ansible_user: pi
The username has been set above for the host git_server using the keyword ansible_user. The ansible_user specified in the inventory can be overridden by the playbook, should there be a requirement!
ansible_username: usernameValidation with ansible-inventory
The ansible-inventory tool is great for validating the structure of an inventory file. It outputs the inventory into a JSON format, being the default. The other formats available are YAML and TOML.
ansible-inventory -i inventory --list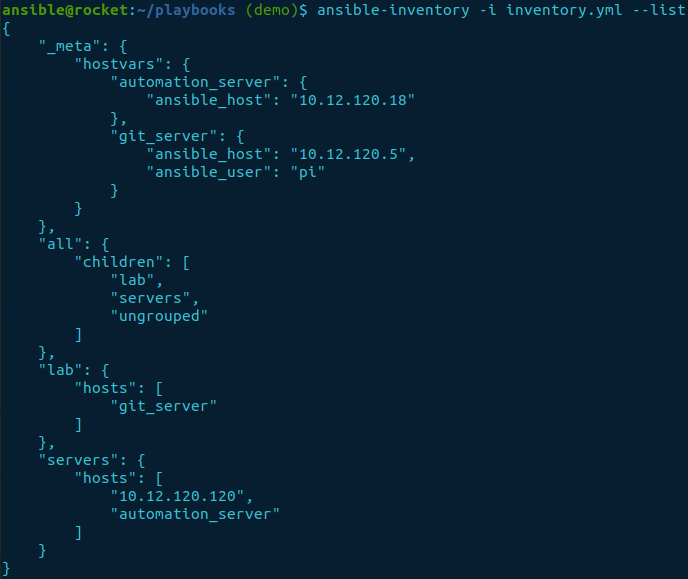
The option --list lists the whole inventory. But, if you want a specific set of hosts, the --host option followed by the group for a list of hosts or hostname for a single server will provide a filtered output.
ansible-inventory -i inventory --host “git_server”
Creating a playbook
The setup we have separates the roles, tasks, handlers, etc..., into the role folder structure. The playbook can specify the host(s), role(s), and variables we would like to run.
Firstly, let us set the hosts we would like to be configured and disable the gather_facts option, as it is not required.
vim create_project_playbook.ymlcreate_project_playbook.yml file
---

- hosts: git_server
  gather_facts: false
Set the remote username
The default setup when running a playbook is to use the local username of the environment you are initiating the playbook in. The username set will be used for all servers within the group if more than one.
vars:
  ansible_user: git
Capturing variables
The goal of this playbook is to set up a new directory and name it via a variable. As we can not hardcode a name into the playbook as it will change each time, we need to gather the information. Now, this is where vars_prompt plays its part. It allows user input each time the playbook runs.
vars_prompt:
  - name: directory
    prompt: Enter directory name to be created
    private: false
Pre-tasks
As the directory name needs to end .git, we can use pre_tasks to ensure it’s in the correct format. pre_tasks are tasks run before roles.
pre_tasks:
  - name: set directory name to the correct format
    set_fact:
      directory: "{{ directory }}.git"
    when: directory is not regex("\.git$")
  - debug:
      msg: "The string is {{ directory }}"
    when: directory is regex("\.git$")
The keyword when provides a conditional expression. It determines whether a task is run based on the result.
Complete playbook file
create_project_playbook.yml
---

- hosts: git_server
  gather_facts: false
  vars:
    ansible_user: "git"

  vars_prompt:
    - name: directory
      prompt: Enter directory name to be created
      private: false

# The pre_tasks are run before the role. Below checks are performed to
# confirm the directory name ends .git.
  pre_tasks:
    - name: set directory name to the correct format
      set_fact:
        directory: "{{ directory }}.git"
      when: directory is not regex("\.git$")
    - debug:
        msg: "Updated the string! {{ directory }}"
      when: directory is regex("\.git$")

# Calls the role create_project in the roles directory
  roles:
    - create_project
Setting the password authentication method
Ansible’s preferred method is to use ssh-keys. Create the ssh-keys and copy the public key over to the server. Then load it into the ssh-agent of the client (where the playbook resides). However, if you followed the previous blog, How to Build a Git Server. Then you should be able to skip this step as they are already in place if using the same client-server setup.
ssh-keygen -t rsa -C “test@ansible”
ssh-add
ssh-copy-id test@10.12.120.5
If you're unsure and need more detail on correctly setting up ssh-keys, I have a blog on How to create SSH keys with in-depth detail.
Setting up tasks
The bulk of the action takes place within the tasks. It’s considered good practice to name tasks and provide comments, explaining what it does and why. There is a mandatory requirement to create a main.yml file, as we are using the Ansible roles setup. Additional named YAML files can be created as required.
main.yml
---

# Checks if the directory named by the variable exists. It registers the
# response where the method .stat.exists can be used later on for future
# tasks.
- name: Check if the directory exists
  stat:
    path: "{{ directory }}"
  register: project_folder

# Calls the create_dir.yml task if the folder doesn't exist to initiate
# the creation.
- include_tasks: create_dir.yml
  when: not project_folder.stat.exists

# Calls the dir_exists.yml task if the folder exists to initiate the creation
- include_tasks: dir_exists.yml
  when: project_folder.stat.exists
I have used the keyword include_tasks to call the additionally named tasks. They have been separated within their own files allowing them to be reused.
create_dir.yml
It will only run if the directory doesn't pre-exist.
---

# Creates a new directory if it doesn't preexist
- name: Create a new directory for Git
  ansible.builtin.file:
    path: "{{ directory }}"
    state: directory
  when: not project_folder.stat.exists

- name: Print final message
  ansible.builtin.debug:
    msg: "{{ directory }} has been created"

# git init --bare for the newly created directory
- name: Create a bare repository
  command: "git init --bare {{ directory }}"
dir_exists.yml
It runs only if the given name already exists and returns the list of directories as a reminder.
---

- name: Print out directory exists
  debug:
    msg: "{{ directory }} already exists! Choose another name"
  when: project_folder.stat.exists

# Gathers a list of directories already created if the supplied name
# is in conflict.
- name: list the files in the directory
  find:
    path: "{{ directory }}/../"
    file_type: directory
  register: found

# Loops through the list of directories limiting the output using the
# loop_control function showing only the label. If msg isn't used in
# debug the default "Hello world!" is displayed.
- name: print results
  debug:
    msg: "{{ item.path }}"
  loop: "{{ found.files }}"  # loops through the items
  loop_control:
    label: "{{ item.path }}"
Loop returned from the directory
The Ansible built-in find module can return a list of files within a specified directory by using the register command to create a variable.
The list of files can then be iterated and printed to the screen using the debug and loop. If the output is too verbose even though you have specified a particular key, there is an additional feature called loop_control. loop_control allows you to set a label that can minimise the output.
If msg isn't included with the debug command, the default message (Hello world!) will be output in the results.
Running the playbook
Finally, all the files are in place. Time to run the playbook to confirm it works.
ansible-playbook -i inventory.yml create_project_playbook.ymlWe now have an automated process to create new Git repositories without manually logging into the server to make the changes.